Amazon Virtual Private Cloud (Amazon VPC)? | VPC Demo
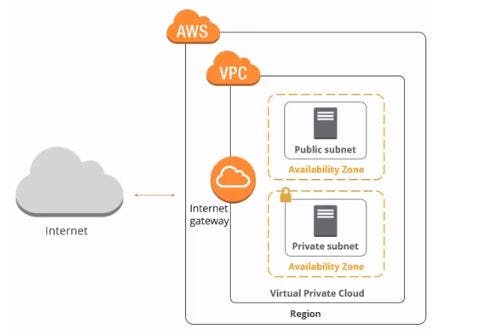
Before we move to AWS VPC, let's first understand quickly What is cloud computing? As we know, cloud computing is the on-demand availability of IT resources like Compute, Storage, and network, and so on. So basically, collections of servers are connected over the internet via a virtual network.
Amazon VPC is one of the foundational AWS Services. In this article, we would be discussing Amazon VPC and its components along with Quick Demo. Let's first quickly look at a list of offerings for networking services by AWS.
AWS Networking Services
- Amazon VPC
- AWS Direct Connect
- Amazon Route 53
- AWS CloudFront
Amazon VPC
Amazon Virtual Private Cloud (VPC) is a logically isolated section of the AWS Cloud where you can launch AWS resources such as EC2, RDS, S3, etc. Amazon VPC can span multiple availability zones in a region. Each AWS account comes with a default VPC that is pre-configured for you, so you can start using it immediately.
Default VPC
Default VPC comes with the CIDR block of 16 subnet masks. For example, 172.31.0.0/16. It means this VPC can provide up to 65,536 IP addresses. Although AWS gives you default VPC, which is suitable for creating instances when testing or learning about AWS. It would be best to create a custom VPC to launch your other AWS Resources inside that VPC for the production environment.
Custom VPC
Custom VPC allows you to customize a virtual network with your desired IP address range. You can create a subnet of both types, which is public subnet & private subnet.
VPC Components & Use Case
Subnet
A subnet is a logical partition of an IP network into multiple, smaller networks. Basically, you are dividing VPC( large network) into smaller networks. You can create two types of subnet inside VPC. One Subnet can only associate with one Route table whereas one Route table can associate with multiple subnets.
1. Public Subnet
2. Private Subnet
Now let's look at the difference between the two of these.
1. Public Subnet
If a subnet's traffic is routed to an internet gateway, the subnet is known as a public subnet.
2. Private Subnet
If a subnet doesn't route to the internet gateway, the subnet is known as a private subnet.
Internet Gateway
Internet Gateway enables access to the Internet inside the VPC. You can attach only one Internet Gateway to One VPC. Internet Gateway is a managed service provided by AWS so it's scalable and reliable.
Route Tables
Route Tables determine where network traffic from your subnets is directed. You can create two types of route tables inside VPC.
1. Public Route Table
2. Private Route Table
Let's briefly look at the difference between these two.
1. Public Route Table
As you have guessed it right, Public Route Table is associated with a public subnet.
2. Private Route Table
Private Route Table associated with a private subnet.
NAT Gateway
Network address translation (NAT) Gateway enables instances in a private subnet to connect to the internet or other AWS Services.
Demo
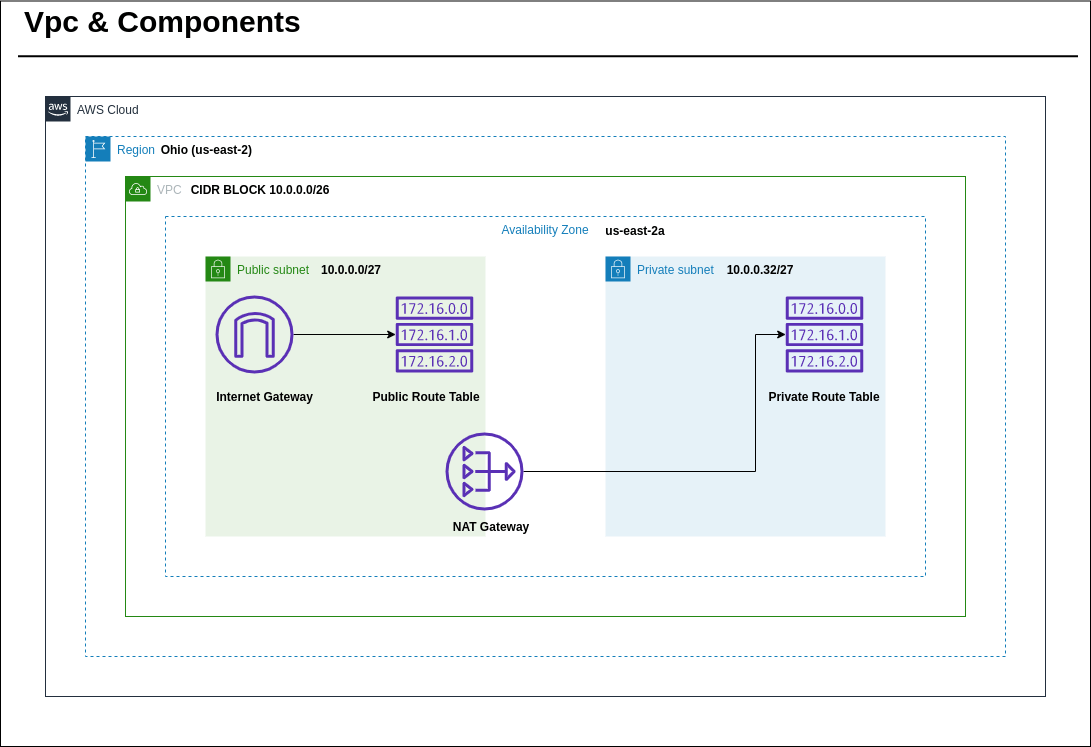
Now let's create all the components we have listed below to understand how to create those things inside AWS Console.
Before getting started, it's always good to look at pricing. VPC's themselves are free. You may pay for additional VPC services (NAT Gateway/VPN/Private Link) and, of course, the actual traffic charges in and out of your Internet Gateway. So make sure to give it a check to AWS VPC Pricing.
Now let's jump into the demo. First, sign in to your AWS account and search VPC. once you click into it, you can follow all the steps mentioned below.
Step 1. In the VPC Console Click on Create VPC
Step 2. Fill in the details and make sure you give the right CIDR block & then click on Create.
In the below example, I have given a 10.0.0.0/26 range for the CIDR block, so let's understand how to calculate how many IP addresses it can provide.
CIDR Block :- 10.0.0.0/26
Starting Ip Address :- 10.0.0.0
Formula For Calculating Number Of IP Address:- 2 ^ (32 - number after the / ) (i.e 26)
So let calculate for our example. 2 ^ (32-26) = 2^6 = 64.
Our last IP Address:- 10.0.0.63
You don't need to calculate each time. But understanding how you can calculate is good to know. You can use this website to make your life a little bit easier. Use this link CIDR.xyz
For tenancy, you have two options.
Tenancy:- Tenancy defines how EC2 instances are distributed across physical hardware and affect pricing.
1. Default Tenancy:- In this option, you will be able to launch all types of EC2 instances with shared tenancy, dedicated instances, and dedicated host.
2. Dedicated Tenancy:- If you choose this option, you will launch only dedicated instances for dedicated host instances.
Click on this to read more about tenancy in aws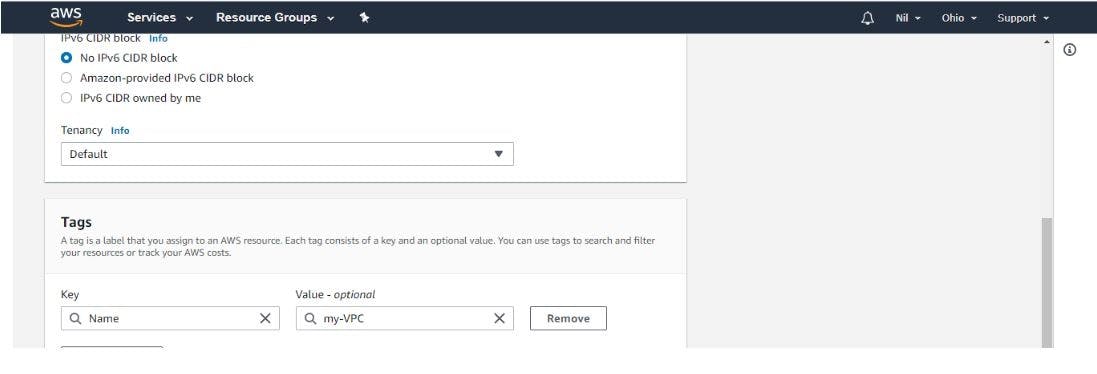
Step 3. To Create a Public Subnet fill in the details and click on Create. [Make sure you provide the correct CIDR partition block otherwise it will throw an error].
Basically, we are dividing our VPC into smaller networks. Here CIDR block is 10.0.0.0/27. So as we discussed above we can have 32 IP address available. But here AWS reserves 5 IP addresses for internal usage. In the 5 IP addresses, it reserves the first 4 and 1 last IP address for its internal use. The Rest of all IP addresses available to the user.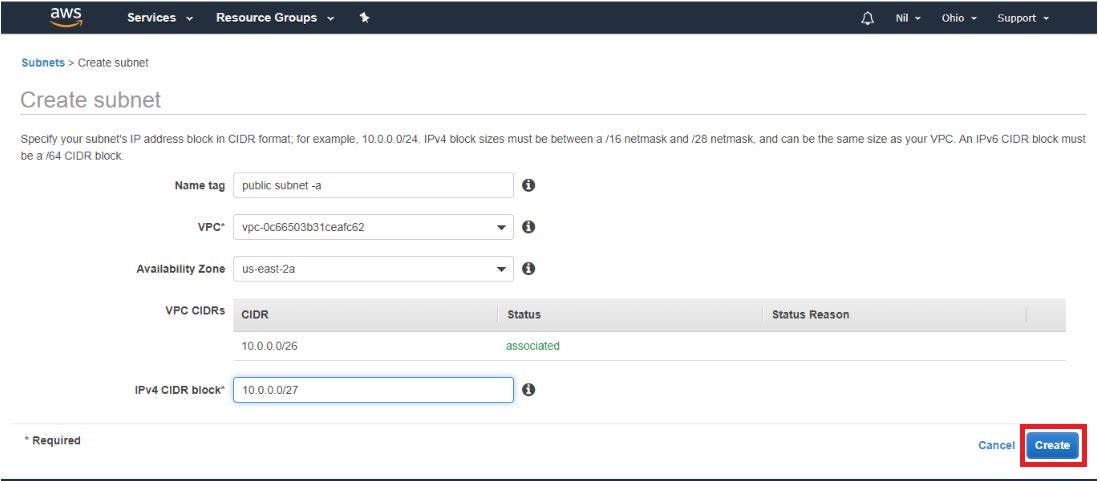
Step 4. To Create a Private Subnet fill in the details and click on Create. [Make sure you provide the correct CIDR partition block otherwise it will throw an error].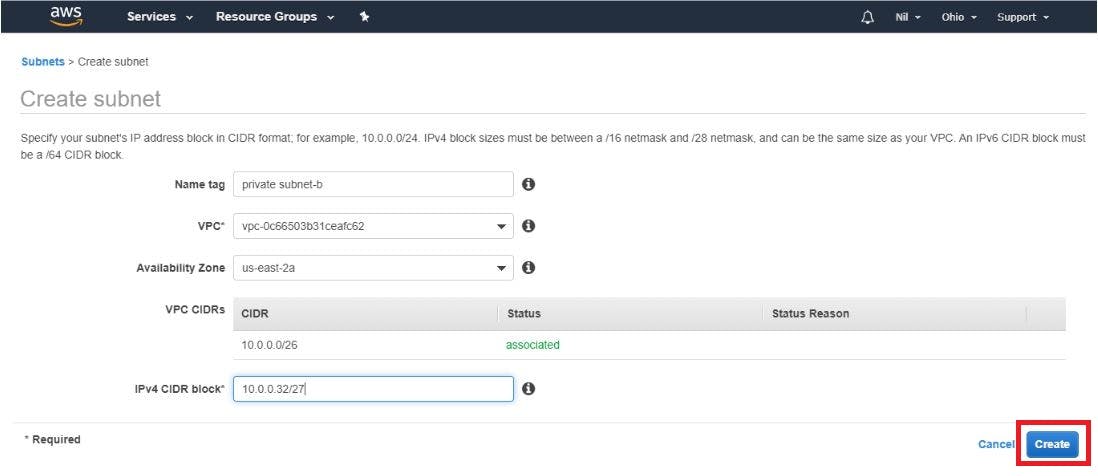
Step 5. To create Route Table go to 'Route Table' from the left side in the VPC Console & then click on Create Route Table. The below image is only shown for Public Route Table. Follow the Same Steps For Private Route Table.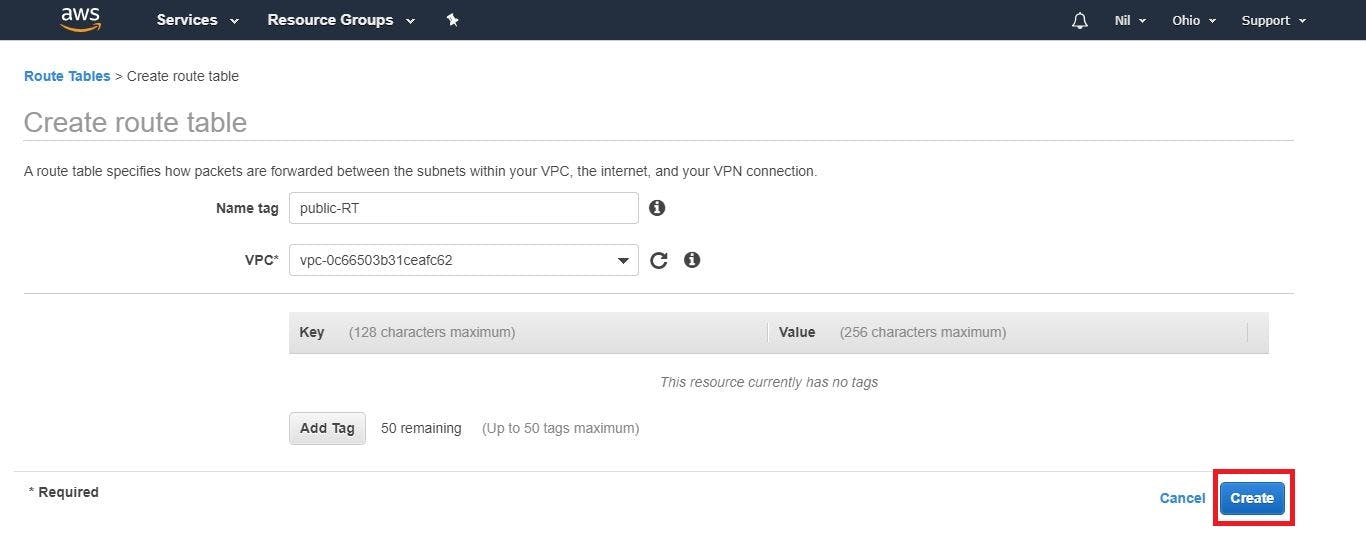
Step 6. The Association of subnet with Route Table for the Private Subnet with the Private Table is shown below. Follow the same for Public Route Table. Click on the recently created Route Table & then go to the Edit Subnet Associations and attach a private subnet with it.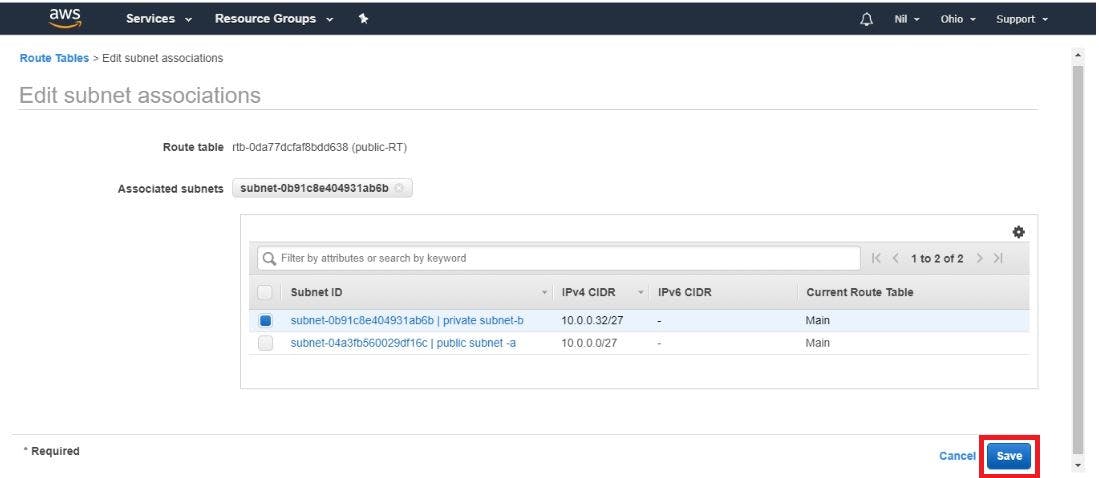
Step 7. To create Internet Gateway click on the Internet Gateway option from the left side of VPC Console & then Click On 'Create Internet Gateway'.
Step 8. Fill in the details in Internet Gateway Settings and then click On Create.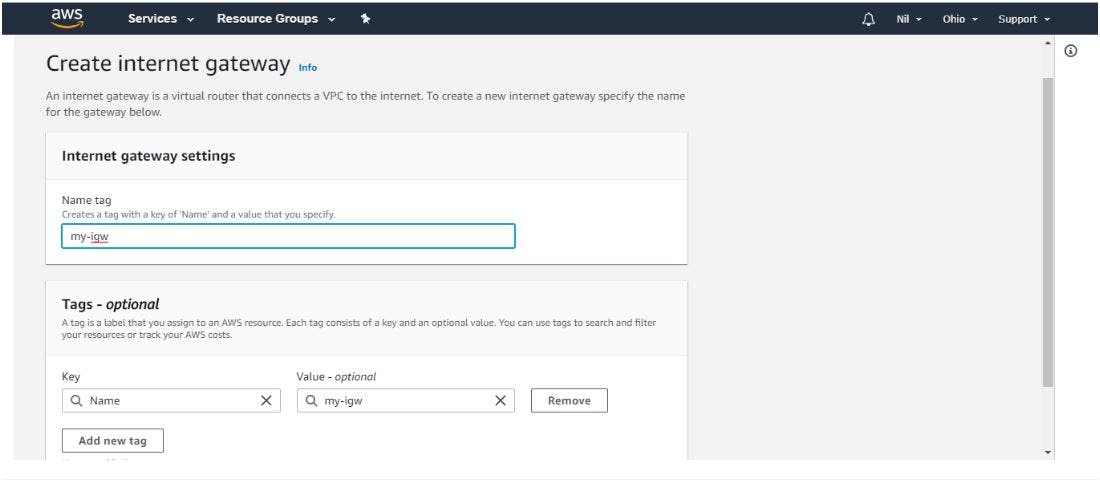
Step 9. Attach Internet Gateway with Our recently Created VPC & Then add the rule for Internet Gateway in Route Table's Edit Rules Menu & then Click On Save Routes.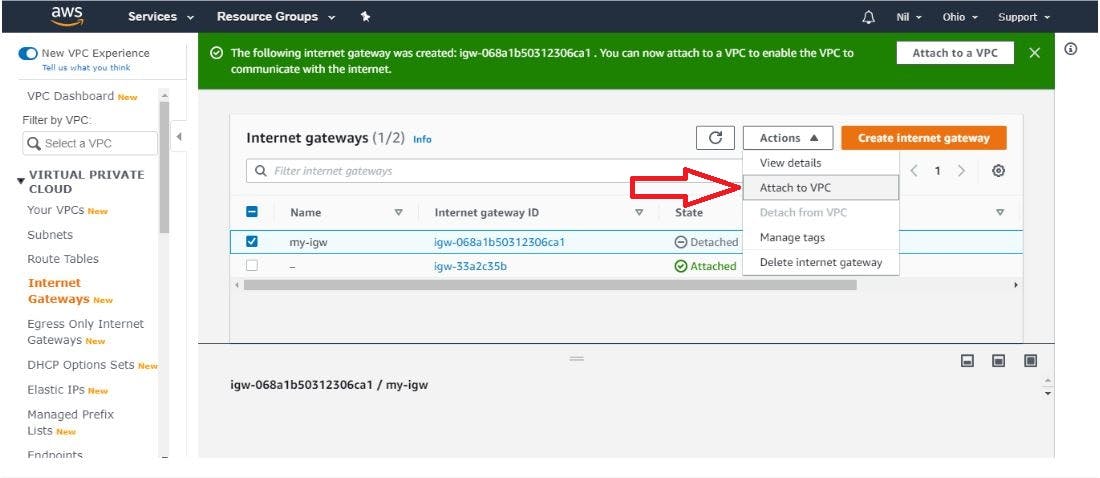
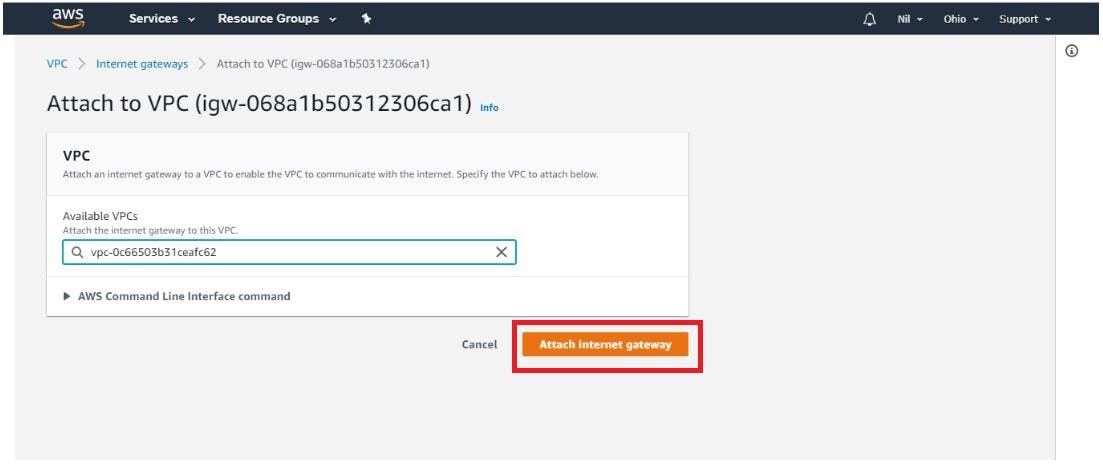

Step 10. To Create NAT Gateway [You have to always select Public Subnet & also allocate Elastic IP] click on 'Create Nat Gateway' & provide the details and click on Create.
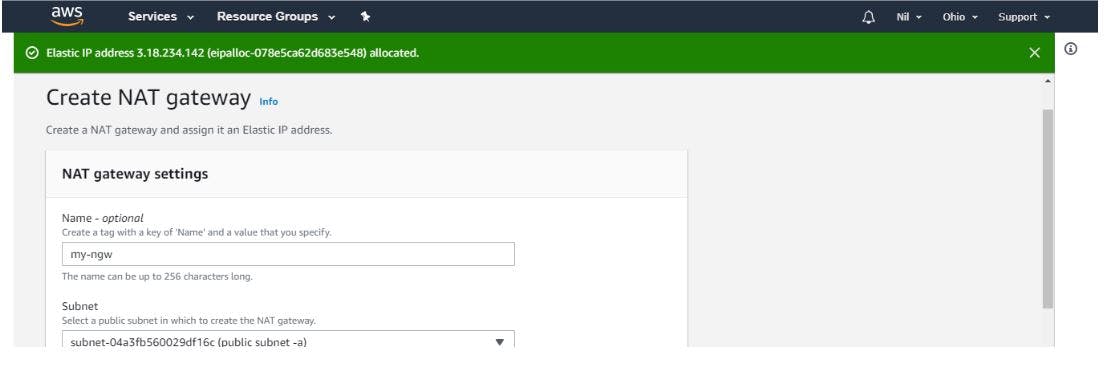
Step 11. Attach NAT gateway with Private Subnet. In which add the routes for making truly Private Subnet.
Step 12. Edit DNS Hostnames in VPC. For that, you need to be on the VPC console and click on the Actions button after that you have to click on 'Edit DNS hostnames' then one pop-up box will open and you have to select yes and then click on the Save button.
Step 13. For creating auto-assign IP for Public Subnet click on Modify Auto Info.


With that, you have practically learned about VPC, Public & Private Subnet, Route Tables, NAT & Internet Gateways.
I hope it will be helpful to you. I will be continuing to write in this AWS networking fundamentals series. Any constructive feedback is welcome. Feel free to connect with me over other platforms like LinkedIn, Twitter. I will be happy to help you.
Thank you.
Resources:-